")
For Users
Installation of Paid Version
Plugin installation Method 1:
- Download the plugin using your BeRocket account.
- Disable FREE version of the plugin.
- Open the Admin Bar of your site and go to Plugins→ Add new→ Upload plugin.
- Click on Browser Dialog to open it, select downloaded zip-file, and click on Install.
- Click on Activate.
Plugin installation Method 2:
- Download plugin using your BeRocket account.
- Disable FREE version of that plugin.
- Access your website using FTP.
- Go to WordPress/wp-content/plugins folder.
- Open downloaded zip-file to unzip its content and copy unzipped files to WordPress/wp-content/plugins folder.
- Open the Admin Bar of your site and go to Plugins.
- Find Plugin and click on Activate.
Plugin Key
BeRocket Plugin Key are used for an auto-update of plugins from BeRocket site.
Where do I find the Product Key?
- Open BeRocket site and log in (the Login button is in the header menu).
- Go to My Account (the My Account button is in the header menu).
- Click on the key icon on the right side from the plugin name WooCommerce Advanced Product Labels:
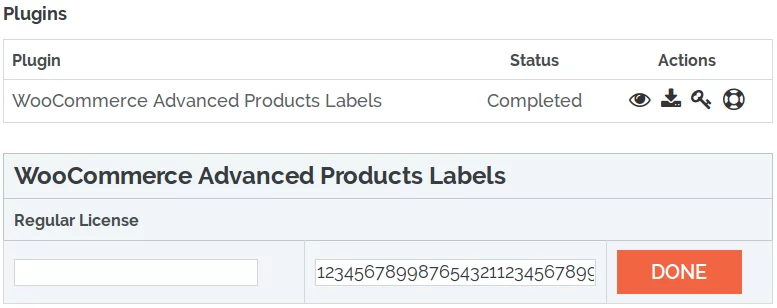
- You can click on Product Key and copy it.
- You can enter any notice for the key in the left-field and click DONE to save.
Plugin Key Activation
To enter the Plugin Key, open the Admin Bar of your site and click on BeRocket→ Account Key.
How do I activate the Plugin Key?
- Copy the Plugin Key from BeRocket site.
- Enter the key into the WooCommerce Advanced Product Labels field.
- Click on Test.
- If you use the right Plugin Key, you will see:
- Click on the Save Changes button.
Watermarks
- To find the plugin’s settings follow Admin Bar→ WooCommerce→ Products Image Watermark
- Select a Watermark or enter text for the needed image type
- More details
Settings
General
Contains general settings for Image watermarks.
- JPEG image quality
- Maximum image height
- Maximum image width
- PHP memory limit on your server
Full image size and “shop_single” image size (main product page image)
- Text on image – text that will be added to images as watermark
- Repeat text – repeat text all across the picture
- Angle – text rotation angle
- Font size – font size in pixels (ranges from 8 to 72px)
- Font color – text color (color picker block/default)
- Font transparency – transparency of the text (ranges from 0 to 100)
- Image count – count of images, that will be added as watermark to product image (1-5)
- Image selector:
- Upload button – select an image from media library or upload a new one
- Remove button – clear field with images
- Position and Size block – you can move grey block with help of drag-and-drop and resize it/ Save aspect ratio
- “shop_catalog” image size. (shop and categories page image)
2. Create images with watermarks
Replace images live
Add watermark to an image when it loads on shop page or product page for the first time.
- + New images on products are watermarked without any actions
- – Slows down page load where images are not watermarked
Replace images via AJAX
- You can restore images or add watermarks to all product images.
- With enabled option “Replace images live” all images will be replaced again
- Save settings to apply all changes to new watermarks
- Click “Regenerate” to replace old watermarks on watermarked images
- Create watermarked images (click “Create” and wait until end)
Do not close this page until end
Create/Restore/Regenerate buttons
Custom CSS
Custom CSS – field for custom CSS; contains custom CSS code settings to be displayed on the front end pages. Custom CSS is the CSS as you want it to be.
Add-ons
Media Library Buttons – buttons for WordPress Media Library to add watermark to images or restore images
Restore Images
To restore images and to not watermark them again follow the steps below:
- Disable option Add watermark to image when it is loadedfor the first time on shop page or product page in the Replace images live section.
- Save settings.
- Click Restore button in the Replace images via AJAX section.
- Wait on this page till the scripts end.
For Developers
Action Hooks
includes/functions.php
br_get_woocommerce_version()
Public function to get WooCommerce version
return string. woocommerce version
woocommerce-products-image-watermark.php
All of these functions are static functions in the BeRocket_image_watermark class.
admin_init ()
Function for initializing scripts and page settings in the admin bar.
options ()
Add option page to admin menu.
br_get_template_part( $name = ” )
Get template part.
- $name – template name
Default templates are placed in plugins folder woocommerce-products-image-watermark/templates.
To rewrite the template in your theme folder create folder with name woocommerce-image_watermark and places new template with identical name in this folder.
add_watermark_to_images( $post_id )
Add watermark to images attached to product with id $post_id.
- $post_id – product id
Filter Hooks
image_watermark_get_template_part
Templates that are used in the plugin.
Parameters
- template – link to template that will be loaded.
- name – template name.
Usage
<?php
function change_image_watermark_get_template_part ( $template, $name ) {
//your code here
    return $template;
}

add_filter( 'image_watermark_get_template_part', 'change_image_watermark_get_template_part', 10, 2 );
?>
br_watermark_check_types
When WordPress tries to get an image with size from this array, the plugin enables the script to add watermarks to images for this product.
Parameters
- types – array with image sizes: shop_catalog, shop_single, shop_thumbnail.
Usage
<?php
function change_br_watermark_check_types ( $types ) {
//your code here
    return $types;
}

add_filter( 'br_watermark_check_types', 'change_br_watermark_check_types', 10, 2 );
?>
br_watermark_replace_types
Array of image sizes to add watermarks.
Parameters
- types – array with image sizes: shop_catalog, shop_thumbnail, thumbnail, shop_single, full.
Usage
<?php
function change_br_watermark_replace_types ( $types ) {
//your code here
    return $types;
}

add_filter( 'br_watermark_replace_types', 'change_br_watermark_replace_types', 10, 2 );
?>
Files
- woocommerce-products-image-watermark.php – main plugin file
- css – folder with CSS files
- admin.css – styles for admin bar
- colpick.css – styles for color picker block
- font-awesome.css – standard Font Awesome styles
- jquery-ui.min.css – styles for jQuery UI
- fonts – Font Awesome fonts
- includes – folder with additional PHP files
- functions.php – public functions
- updater.php – BeRocket Updater for plugins update from BeRocket site
- js – folder with JavaScript files
- admin.js – JavaScript for admin bar settings
- colpick.js – JavaScript for color picker in the admin bar settings
- templates – templates for settings, list style and buttons
- settings.php – plugin settings page