")
For Users
Installation of Paid Version
Plugin installation Method 1:
- Download the plugin using your BeRocket account.
- Disable FREE version of the plugin.
- Open the Admin Bar of your site and go to Plugins→ Add new→ Upload plugin.
- Click on Browser Dialog to open it, select downloaded zip-file, and click on Install.
- Click on Activate.
Plugin installation Method 2:
- Download plugin using your BeRocket account.
- Disable FREE version of that plugin.
- Access your website using FTP.
- Go to WordPress/wp-content/plugins folder.
- Open downloaded zip-file to unzip its content and copy unzipped files to WordPress/wp-content/plugins folder.
- Open the Admin Bar of your site and go to Plugins.
- Find Plugin and click on Activate.
Plugin Key
BeRocket Plugin Key are used for an auto-update of plugins from BeRocket site.
Where do I find the Product Key?
- Open BeRocket site and log in (the Login button is in the header menu).
- Go to My Account (the My Account button is in the header menu).
- Click on the key icon on the right side from the plugin name WooCommerce Advanced Product Labels:
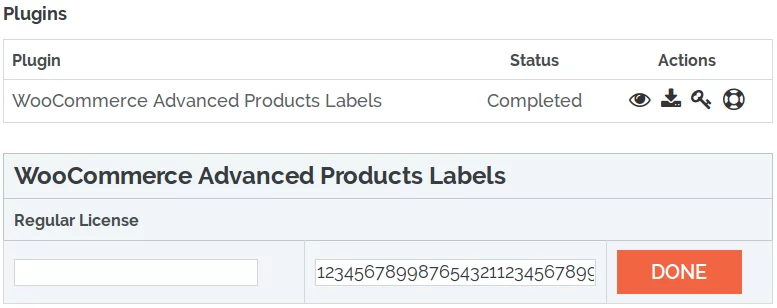
- You can click on Product Key and copy it.
- You can enter any notice for the key in the left-field and click DONE to save.
Plugin Key Activation
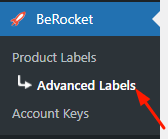
To enter the Plugin Key, open the Admin Bar of your site and click on BeRocket→ Account Key.
How do I activate the Plugin Key?
- Copy the Plugin Key from BeRocket site.
- Enter the key into the WooCommerce Advanced Product Labels field.
- Click on Test.
- If you use the right Plugin Key, you will see:
- Click on the Save Changes button.
Settings
To find WooCommerce Advanced Product Labels settings follow Admin Bar→ WooCommerce→ Products Labels.
- General – global label settings
- Advanced – a set of advanced options
- Add-ons – special interface modifications
- Javascript/CSS – custom code
- Labels – labels settings
- License
General

- Disable global labels – disables labels that are added to all products on the page: admin bar→ Products→ Advanced Labels.
- Disable product labels – disables labels, that are added to the product editing page.
- Disable labels on product page – disables labels on the product page.
- Remove WooCommerce labels – enable/disable.
- Start for Better position of labels – finds a better position for a block with labels on images [px]:
- Top
- Right
- Bottom
- Left
- Attribute data set – label position lines (only if several labels are placed in one line).
- Line 1-9
- Display all labels
- Limit height
- Cut line at the end of image
- Limited labels count
Advanced

- Shop Hook – label’s output on shop pages depends on the selected hook. Some themes might lack these hooks, or have them located differently from WooCommerce:
- Before Title 1
- Before Title 2
- After Title
- Before All
- After All
- =DISABLED=
- Product Hook Image – label’s output on shop pages depends on the selected hook. Some themes might lack these hooks, or have them located differently from WooCommerce:
- Under thumbnails
- After Image
- Before Summary Data
- After Title
- After Summary Data
- Before All
- =DISABLED=
- Product Hook Label – default Label’s output on a product page depends on the selected hook. Some themes might lack these hooks, or have them located differently from WooCommerce.
- Under thumbnails
- After Image
- Before Summary Data
- After Title
- After Summary Data
- Before All
- =DISABLED=
- =ADDITIONAL= woocommerce_product_thumbnails+15
- Timer Shop Hook – place for the timers (large version) on the shop page:
- Before product
- After product image
- After product title
- Before “Add to cart button”
- After “Add to cart button”
- Timer Product Hook – place for the timer (large version) on the product page:
- Before product
- After product image
- Before product description
- After product description
- Before “Add to cart”
- After “Add to cart”
- After product
ADDITIONAL HOOKS – selecting additional hooks can break the shop/product pages. Use these only if the default Hooks do not work.
Add-ons

- Advanced Content – allows you to attach a label Link (Advanced Label Settings→ General→ Link). A new page will be opened when a user clicks on the label (Open in a new tab – enabled/disabled). To enable the add-on follow BeRocket→ Product Labels → Setting→ Add-ons→ Advanced Content. Click on the cube and then click on the button Save Changes.
- Gradients – this addon allows you to add gradients to labels.
- Labels for Variations – this addon allows you to add labels to variations.
- Timers – this addon allows you to add timers to shop/product pages.
- AJAX load – Load labels via AJAX after when page is loaded.
Timer
The following settings are only available with the Timer add-on on.

- Shop Timer Hook – the output of labels timer on the shop page depends on the selected hook. Some themes may lack these hooks, or they may be located differently from WooCommerce:
- Before product
- After product image
- After product title
- Before «Add to cart» button
- After «Add to cart» button
- Product Timer Hook – the output of labels timer on the product page depends on the selected hook. Some themes may lack these hooks, or they may be located differently from WooCommerce:
- Before product
- After product image
- Before product description
- After product description
- Before «Add to cart» button
- After «Add to cart» button
- After product
- Load timers via AJAX – enable/disable timer load with AJAX (fixes issues with chaching plugins).
Javascript/CSS
- Disable Font Awesome: do not upload the CSS file for Font Awesome to the site. Disable it only if you do not use Font Awesome icons in widgets or you have Font Awesome in your theme.
- Font Awesome Version – version of Font Awesome, which will be used in the settings and the front end pages of the shop. Please select the version that is in your theme.
- Font Family – select the type of Google font.
- If the font from the Font Family is not selected (Label Settings→ Style→ Font Family→ Default), then the font from the Settings is selected (Settings→ CSS→ Font Family).
- If no Font Family font is selected, then your theme font will be selected.
- Custom CSS – field for custom CSS; contains custom CSS code settings to be displayed on the front end pages. Custom CSS is the CSS as you want it to be.
- Javascript On Page Load – runs custom Javascript on page load.
Label Setup
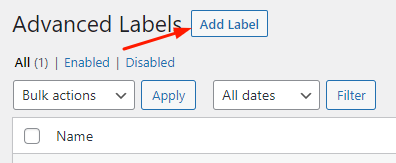
How do I add a new Label?
- Open the Admin Bar of your site and follow BeRocket→ Advanced Product Labels.
- Click on the Add Label button.
- Select the desired settings and press the Save button.
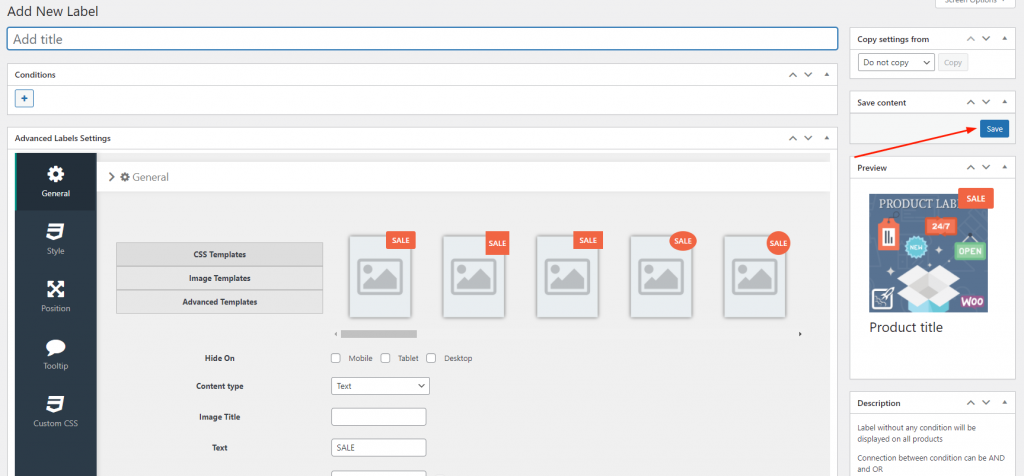
- Click on the “+” sign belowConditions and select the desired condition.
- Label Conditions – allows you to add two conditions to display labels on products. Click on “+” button, which is below the Conditions, and select the needed condition: + button, which is outside any blocks, adds new blocks that are connected as OR; + button, which is inside each block, adds new condition as AND.
- Select the desired Content type and enter the information for the selected Content type.


You can find the Advanced Label Settings in the following section.
Label Settings
- Conditions
- General
- Style
- Position
- Tooltip
- Custom CSS
Conditions
- Product:
- Equal
- Not Equal
- Category:
- Equal
- Not equal
- Include subcategories
- On Sale:
- Yes
- No
- Bestsellers:
- Count of product
- Price:
- Equal
- Not equal
- From
- To
- Product price
- With tax
- Without tax
- Stock Status:
- In stock
- Out of stock
- On backorder
- Total Sales:
- Equal
- Not equal
- Equal or less
- Equal or more
- Count of product
- Featured:
- Equal
- Not equal
- Product Age:
- Equal
- Not equal
- Equal or less
- Equal or more
- day(s)
- Product Type
- Equal
- Not equal
- Simple product
- Grouped product
- External/Affiliate product
- Variable product
- Product Rating:
- Has Rating:
- Yes
- No
- Has Rating:
- Product Attribute:
- Equal
- Not equal
- Select attribute:
- ==Any==
- Simple product
- Grouped product
- External/Affiliate product
- Variable product
- Sale price:
- Equal
- Not equal
- From
- To
- Regular price:
- Equal
- Not equal
- From
- To
- Stock quantity:
- Equal
- Not equal
- Equal or less
- Equal or more
- Products in stock
- Backorder allowed:
- ==Any==
- Yes
- No
- Page ID:
- Equal
- Not equal
General
- CSS Templates

- Images Templates

- Advanced Templates


- Hide on:
- Mobile
- Tablet
- Desktop
- Content type – a type of label content:
- Text – block of text with a background color.
- Discount percentage – block of text (percentage of discount) with a background color.
- Price – a block with text (product price) and colored background.
- Stock status – displays the availability of goods in stock.
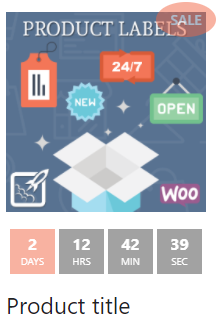
- Time left for discount – block of text (time left for discount) with a background color.
- Discount amount – a block with text (discount amount) and color background.

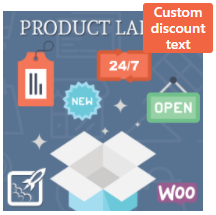
- Custom discount text.
- Product attribute – use attributes in the form of labels (text, color, or image).
- Discount percentage:
- Background Picture – allows you to upload (or remove) an image from the library to the label background.
- Text Before – text, that will be displayed before the discount percentage (New Line – text that will be displayed in another line).
- Text After – text, that will be displayed after the discount percentage (New Line – text that will be displayed in another line).
- Use the minus symbol – if the setting is enabled the minus symbol will be displayed before the discount percentage.
- Price:
- Background Picture – allows you to upload (or remove) an image from the library to the label background.
- Text Before – text, that will be displayed before the product price (New Line – text that will be displayed in another line).
- Text After – text, that will be displayed after the product price (New Line – text that will be displayed in another line).
- Stock Status:
- Background Picture – allows you to upload (or remove) an image from the library to the label background.
- Text Before – text, that will be displayed before the stock status (New Line – text that will be displayed in another line).
- Text After – text, that will be displayed after the stock status (New Line – text that will be displayed in another line).
- Time left for discount:
- Background Picture – allows you to upload (or remove) an image from the library to the label background.
- Text Before – text, that will be displayed before the time left for discount (New Line – text that will be displayed in another line).
- Text After – text, that will be displayed after the time left for discount (New Line – text that will be displayed in another line).
- Discount amount:
- Background Picture – allows you to upload (or remove) an image from the library to the label background.
- Text Before – text, that will be displayed before the discount amount (New Line – text that will be displayed in another line).
- Text After – text, that will be displayed after the discount amount (New Line – text that will be displayed in another line).
- Use the minus symbol – if the setting is enabled the minus symbol will be displayed before the discount amount.
- Custom discount text:
- Background Picture – allows you to upload (or remove) an image from the library to the label background.
- Text – the text that will be displayed on the label.
- Replacements:
%sale_p% – Discount percentage
%sale_val% – Discount amount
%sale_end% – Time left for discount
%sale%ANYTEXT%sale% – Display ANYTEXT only if a product with discount
%nsale%ANYTEXT%nsale% – Display ANYTEXT only if a product without discount - Text Before – text, that will be displayed before the custom discount text (New Line – text that will be displayed in another line).
- Text After – text, that will be displayed after the custom discount text (New Line – text that will be displayed in another line).
- Product attribute:
- Text Before – text, that will be displayed before the product attribute (New Line – text that will be displayed in another line).
- Text After – text, that will be displayed after the product attribute (New Line – text that will be displayed in another line).
- Attribute:
- Attribute values – select an attribute or a category to display on a label.
- Display the first available value.
- Attribute data type – allows you to select the time of attribute data output.
- Text.
- Color.
- Image.
- Text – block of text with a background color.
- Link – opens a new page when a user clicks on the label (available only if the Advanced Content add-on is enabled: BeRocket→ Product Labels→ Setting→ Add-ons→ Advanced Content)):
- Open in a new tab.
- Use timer – enable/disable the product timer with a temporary discount (can be enabled with the add-on on: BeRocket→ Product Labels→ Settings→ Add-ons→Timer)
- Large – select a big timer style;
- Compact – select a small timer style;
- Paddings – paddings around a timer; CSS units – px|em|%;
- Show leading zeros – show 0 in front of days/hours/minutes/seconds

- Use opacity – if opacity is set in the Style tab settings, then it will also be applied to the timer
- Use shadow – if shadow is set in the Style tab settings, then it will also be applied to the timer


Style
- Use background color – enable/disable.
- Background color – a background color for the blocks with images or text; if the setting is not enabled, the background will be transparent.
- Font color – font color for the blocks with text.
- Font Family – select the type of Google font.
- If the font from the Font Family is not selected (Label Settings→ Style→ Font Family→ Default), the font from the General Settings is selected (Settings→ CSS→ Font Family).
- If no Font Family font is selected, then your theme font will be selected.
- Font size – the font size in the blocks with a text; select the units of measure px|em|%.
- Line height – the line height for the text in a label; select the units of measure px|em|%.
- Height – the height of labels, empty to set auto height for content; select the units of measure px|em|%.
- Width – the width of labels, empty to set auto width for content; select the units of measure px|em|%.
- Border radius – the border corner radius for blocks; select the units of measure px|em|%.
- Border width – border width for a label block.
- Border color – border color for a label block.
- Size multiplier – allows you to make a label’s size bigger by using the slider or setting a number.
- Opacity – [number].
- Use shadow effect – adds shadows to labels:
- Shadow shift right
- Shadow shift down
- Shadow blur
- Shadow opacity
- Shadow color
- Use gradient (enable Gradient in Add-ons):
- Gradient orientation:
- Linear
- Radial

- Elliptical
- Linear
- Gradient angle [degrees]
- Gradient start color
- Gradient end color
- Gradient orientation:


Position
- Type – a type of label position:
- Label – displayed below the product image.
- On image – displayed on images.
- In Title – displayed in the product title.
- Label – displayed below the product image.
- Better Position – enabled/disabled – enables a better position for labels, that has some more settings (paddings, margin, lines of labels):
- Position:
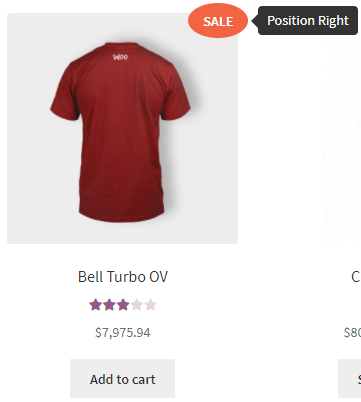
- Right
- Center
- Left
- Right
- Position Line – the position label line, displays labels one by one. Labels from different lines will be displayed vertically. One by One – displays labels on the next line, if the previous one has a label.
- Paddings – padding around text, better use it with empty Height and Width in Style settings; select the units of measure px|em|%;
- top
- right
- bottom
- left
- top
- Margin – paddings around labels; select the units of measure px|em|%;
- top
- right
- bottom
- left
- top
- Position:
- Padding from top – paddings from top of the image; negative padding (only for Type – On image, when Better Position is disabled); select the units of measure px|em|%;
- Padding from left/right – padding from left/right of the image (only for Type – On image, when Better Position is disabled); select the units of measure px|em|%;
- Position – the position of labels:
- Left
- Center
- Right
- Position Line:
- One by one
- Line 1 – Line 9
- Rotate – label rotation around the center (-90 to 90 degrees).

- Z index – specifies the stack order of elements.


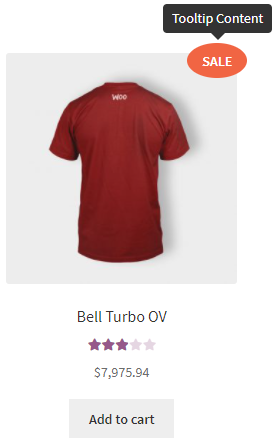
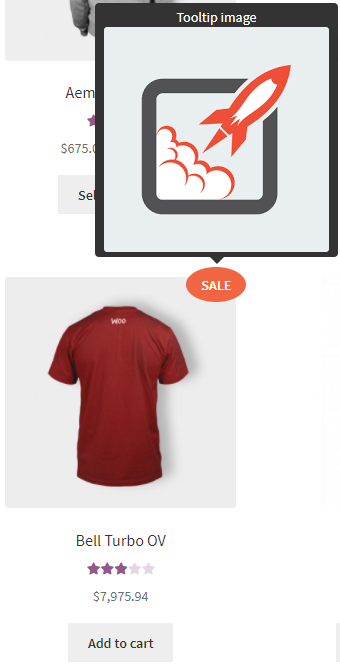
Tooltip
- Content – allows you to add text, which will be shown in the Tooltip.
- Tooltip image:
- No image
- Upload
- Style:
- Dark
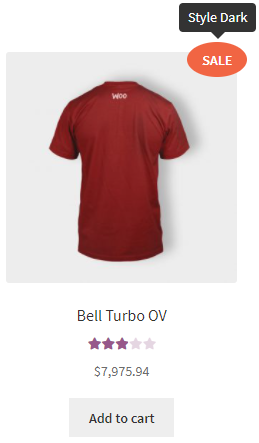
- Light

- Translucent
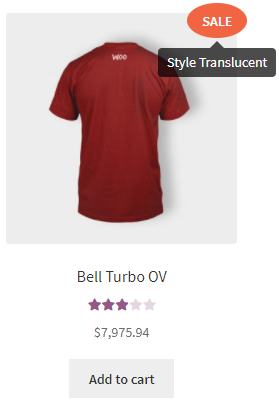
- Dark
- Position – allows you to choose where the tooltip should appear:
- top

- bottom
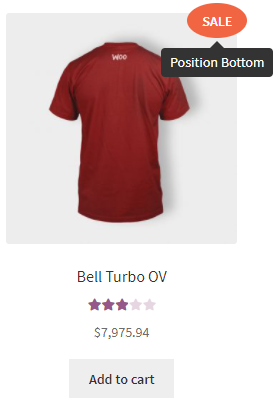
- left
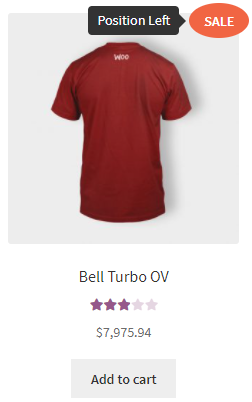
- right
- top
- Open delay– set how long it will take to open a tooltip [ms]
- Close delay – set how long it will take to close a tooltip [ms]
- Open on – allows you to select the condition to display the tooltip (* if a label has a link, tooltip will always open on hover):
- click – when you click with the cursor on the label.
- hover – when you hover the cursor on the label.
- Close on click everywhere – when enabled, a tooltip will close by clicking anywhere.
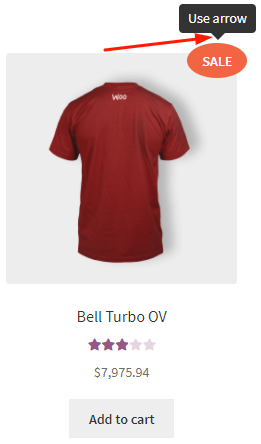
- Use arrow – allows you to show the arrow for a tooltip.
- Max width – allows you to set the maximum width for a tooltip.


Custom CSS
This section is intended for advanced users and developers only. Please do not use it if you do not know how it works.
Label’s HTML:
<div>
     <span>
         <i></i>
         <i></i>
         <i></i>
         <i></i>
         <b>TEXT OF LABEL</b>
     </span>
</div>‹div›block custom class‹div›block custom CSS‹span›block custom class‹span›block custom CSS‹b›block custom class‹b›block custom CSS- 1)
‹i›block custom class - 1)
‹i›block custom CSS - 2)
‹i›block custom class - 2)
‹i›block custom CSS - 3)
‹i›block custom class - 3)
‹i›block custom CSS - 4)
‹i›block custom class - 4)
‹i›block custom CSS
Settings per-theme
Avada
Custom CSS Settings
Open the Admin Bar of your site and follow WooCommerce→ Products Labels→ Custom CSS.
Add this CSS to the field “User custom CSS style”:
ul.products li.product a.product-images
 {
     display: inline-block;
 }
Clean Commerce
Custom CSS Settings
Open the Admin Bar of your site and follow WooCommerce→ Products Labels→ Custom CSS.
Add this CSS to the field “User custom CSS style”:
ul.products li.product h2.woocommerce-loop-product__title
{
    clear: both;
}
Divi
Custom CSS Settings
Open the Admin Bar of your site and follow WooCommerce→ Products Labels→ Custom CSS.
Add this CSS to the field “User custom CSS style”:
ul.products li.product h2.woocommerce-loop-product__title
{
    clear: both;
}
Louis
Custom CSS Settings
Open the Admin Bar of your site and follow WooCommerce→ Products Labels→ Custom CSS.
Add this CSS to the field “User custom CSS style”:
ul.products li.product h2.woocommerce-loop-product__title
{
    clear: both;
}
NovelLite
Custom CSS Settings
Open the Admin Bar of your site and follow WooCommerce→ Products Labels→ Custom CSS.
Add this CSS to the field “User custom CSS style”:
ul.products li.product h2.woocommerce-loop-product__title
{
    clear: both;
}
X
Custom CSS Settings
Open the Admin Bar of your site and follow WooCommerce→ Products Labels→ Custom CSS.
Add this CSS to the field “User custom CSS style”:
ul.products li.product header.entry-header h3
{
    clear: both;
}
For Developers
Action Hooks
berocket_apl_set_label_start
The hook is called before labels are displayed.
Parameters:
- $product – WC_Product object of a product or a line with the text ‘demo’.
berocket_apl_set_label_end
The hook is called after labels are displayed.
Parameters:
- $product – WC_Product object of a product or a line with the text ‘demo’.
berocket_apl_set_label
The output of product labels. The global variable $product must be set.
Parameters:
- $type – the label type for the output: true (outputs all labels), ‘image’, ‘label’.
Filter Hooks
berocket_apl_set_label_prevent
Prevent the output of labels on the product.
Parameters:
- $prevent – prevent the output or not.
- $type – the type of output (TRUE, ‘image’, ‘label’).
- $product – WC_Product object of a product.
berocket_labels_get_args
Filtering arguments to get labels through WP_Query.
Parameters:
- $args – arguments for getting labels.
berocket_apl_label_show_text
Filtering the text used in texts of labels.
Parameters:
- $text – text in a label.
- $label – label settings.
- $product – WC_Product object of a product or a line with the text ‘demo’.
berocket_apl_label_show_label_style
Filtering the styles of the labels of <span> block custom class.
Parameters:
- $label_style – line with label styles.
- $label – label settings.
- $product – WC_Product object of a product or a line with the text ‘demo’.
berocket_apl_label_sanitize_data
Filtering the label settings before output.
Parameters:
- $label – label settings.
- $product – WC_Product object of a product or a line with the text ‘demo’.
berocket_apl_label_show_div_style
Filtering the <div> styles of a label block.
Parameters:
- $style – line with styles.
- $label – label settings.
- $product – WC_Product object of a product or a line with the text ‘demo’.
berocket_apl_label_show_div_class
Filtering the line of <div> classes of a label block.
Parameters:
- $class – line with classes.
- $label – label settings.
- $product – WC_Product object of a product or a line with the text ‘demo’.
berocket_apl_label_show_custom_css
Filtering additional label styles.
Parameters:
- $style – line with styles.
- $label – label settings.
- $product – WC_Product object of a product or a line with the text ‘demo’.
- $style_id – class <div> of a label block.
berocket_apl_label_show_text_each
Filtering each text on a label before the output (there can be multiple texts for one label, e.g. in the output of attributes).
Parameters:
- $text – line with a text.
- $label – label settings.
- $product – WC_Product object of a product or a line with the text ‘demo’.
berocket_apl_show_label_on_product_html
Filtering HTML label code.
Parameters:
- $html – array with elements (the order in an array defines the output order).
- $label – label settings.
- $product – WC_Product object of a product or a line with the text ‘demo’.
berocket_apl_content_type_with_before_after
Filtering the list of the Content type for which text is added before and after.
Parameters:
- $content_types – array with the Content type.
berocket_apl_settings_shop_hook_array
Hooks to display labels on the shop page.
Parameters:
- $hooks – array with hooks.
berocket_apl_settings_single_hook_array_image
Hooks to output labels before images on the product page.
Parameters:
- $hooks – array with hooks.
berocket_apl_settings_single_hook_array_label
Hooks to output labels under the image on the product page.
Parameters:
- $hooks – array with hooks.
berocket_apl_better_position_labels_html
Filtering the array with all labels that use Better Position.
Parameters:
- $labels_html – array with labels.
berocket_apl_wc_save_product
Filtering the label settings while saving.
Parameters:
- $label – label settings.
- $post_id – ID post for a label.
Files
- woocommerce-advanced-products-labels.php – the main data file of the plugin for WordPress.
- main.php – is the main plugin file.
- loco.xml – additional information for Loco Translate plugin.
- wpml-config.xml – additional information for WordPress Multilingual plugin.
- berocket – is a framework for BeRocket plug-ins.
- css – plugin styles:
- admin.css – styles for plugin settings;
- frontend.css – styles for labels;
- templates.css – styles for some templates;
- tippy.css – styles for tooltips on labels.
- images – images used in the plugin.
- includes – files with functions and basic functionality:
- compatibility – compatibility files with other plugins;
- better_position.php – Better Position of labels;
- custom_post.php – create and configure label posts;
- paid.php – additional features for the paid version;
- tripwire.php – additional conditions and features.
- js – Javascript files of the plugin:
- admin.js – scripts for plugin settings;
- tippy.min.js – a script for tooltips on labels;
- templates – output templates:
- label.php – setup template on product pages.